...currently...

Enjoying the chill in the air and dreaming up designs in velvet and wool.

Monday, October 29, 2012

Robe de mariée

One of my favorite projects of the past season was plagued with mishaps from the start. The first day I met Rachelle for our consultation, I had left my notes from our phone conversation at home, and couldn't even remember her name. She had gotten lost en route to the coffeeshop and arrived later than she wanted. We were both flustered and tense - but after a hot drink, some commiseration and laughter, and a little brainstorming, it was obvious that we were both going to enjoy the process of making her dream dress into reality.


Rachelle is a French teacher (whose now-husband Patrick is originally from France), and wanted a pretty countryside wedding that felt both Continental and comfortable, with a vintage-inspired wedding gown that she could relax in while still looking and feeling like the bride that she was. 

After drawing up the sketches, we ordered a bright, pearl white silk dupioni, but the wrong fabric arrived; when I pulled the silk out of the package, I was taken aback by the color. I wasn't sure what to call it, but it wasn't white. Nor was it gray, or silver, or gold. I suppose if I had to call it something, I'd say it was the palest platinum imaginable. What was certain was that it was one of the most gorgeous pieces of cloth I'd ever seen in my life. Instead of sending back to my supplier to exchange it for the correct fabric, I called Rachelle, and asked to meet her for another cup of coffee so I could show her what we'd received.


Rachelle - who'd broken her little foot and was now on crutches, mere weeks before her wedding - also fell in love with this silk we'd received by mistake. A close look at the cut edge revealed it was woven out of pale silver threads crossed with palest wheat-gold threads in the other direction. We couldn't tell if it was warm or cool, but because of that tiny hint of gold, changed our minds about the pearl buttons we'd originally planned and decided to use antique gold down the back and to fasten the deep cuffs. (I might have actually giggled when sewing them on, I was so pleased by the combination.)


The wedding day was set for late summer and we knew it would be very warm outside, so it was important to her that we use breathable fabrics as much as possible. We lined the gown with tissue linen, and I made a special removable crinoline underskirt out of linen instead of the usual poly to support just a few layers of the lightest-weight tulle.


Rachelle decided last-minute to add a simple ribbon sash of French blue to her ensemble, and I love the whole effect. Looks like someone else did, too!


My best wishes to you both! Rachelle, if the way you took all the setbacks and curve-balls before your wedding is any indication, you've got one of the best approaches to life I've seen. Your grace, humor and flexibility are invaluable gifts, and it was lovely to see all of that overflowing during a time that often stresses people to their limits. Cheers!!!

Special thanks to Sara Renee for the use of her lovely photos. Everyone, please visit www.sararenee.com and show her some love. =)

Saturday, June 30, 2012

The Great Outdoors


I first met Dee last year when she had a bit of pre-Hawaii-vacation sewing for me to do. I liked her right away - she's got this great combination of no-nonsense-physical-therapist meets imaginative-fun-loving-kayaking-fantasy-geek vibe going on.


So I knew when she called me up a few months later to tell me that the Hawaii vacation "took" (part of the point of the getaway had been for her to spend a bit of focused time getting to know that handsome gentleman right there) and that she wanted to talk wedding party garb, that it was going to be out of the ordinary and it was going to be fun.


At our first design meeting, Dee came with the idea for the bridesmaids fairly well-set. Since all of the lovely ladies were down-to-earth women who were comfortable in who they are and none of them were particularly girly, Dee wanted to have them in laid-back, flowing garments instead of the usual cocktail dresses. The reception was planned for a wooded area next to the river, and she didn't want anyone held back from enjoying themselves by having to worry about finicky clothes! After scouring the local fabric shops, we decided on wide-legged linen pants in a tobacco brown and mandarin-collared tunic vests a crinkly, sheer sage over simple chocolate tank tops. 


The bridal fabric was a bit more difficult to settle on, until a magic moment when we held a lovely light embroidered sheer over a soft, flowing white pongee. Dee actually jumped up and down and clapped her hands like a delighted little girl (and then recovered and gave me her more standard high-five.) It WAS pretty stuff, very lightweight and cool, and was the unexpectedly perfect thing to use for the design we'd developed. 


Dee doesn't wear dresses all that often herself, so her primary considerations were that it be comfortable, fitting her athletic and outdoorsy personality, but also - she admitted - she wanted to feel a little bit like a princess. Maybe an elf. She had come to me with the basic idea of a sleeveless tank dress with a boat neck and a keyhole back. We tweaked it a bit to work with her jewelry and the fabric we'd found, and the end result made us both smile.


(Their getaway car was a kayak. As in, they actually paddled away from the reception. How cool is that?)
Congratulations, you two!


Photos all courtesy of Wendy Sue Tipton.

Thursday, May 24, 2012

Blue Bridesmaid

It's been one of those months where I have three billion projects in the works, and none of them photographable either because they're unfinished or because they're for weddings that haven't happened yet, and we can't risk a groom seeing his bride's dress before their big day!

But I did just put together something very pretty last night...part of a bridesmaid dress that I'm wearing in a couple of weekends. I finally have something solid to show after some real headache-inducing work (TRY doing multiple fittings on yourself. Irritatingly time-consuming and apt to cause a colorful outburst or two. Or eleven.) This is the back bodice, with the buttons just sitting on it for the moment. More to come soon!

 
Do the buttons look familiar? They're the same gorgeous little guys I used on this wedding dress. I love them and am stoked to finally put them on a dress for myself!


Tuesday, April 10, 2012

Dainties


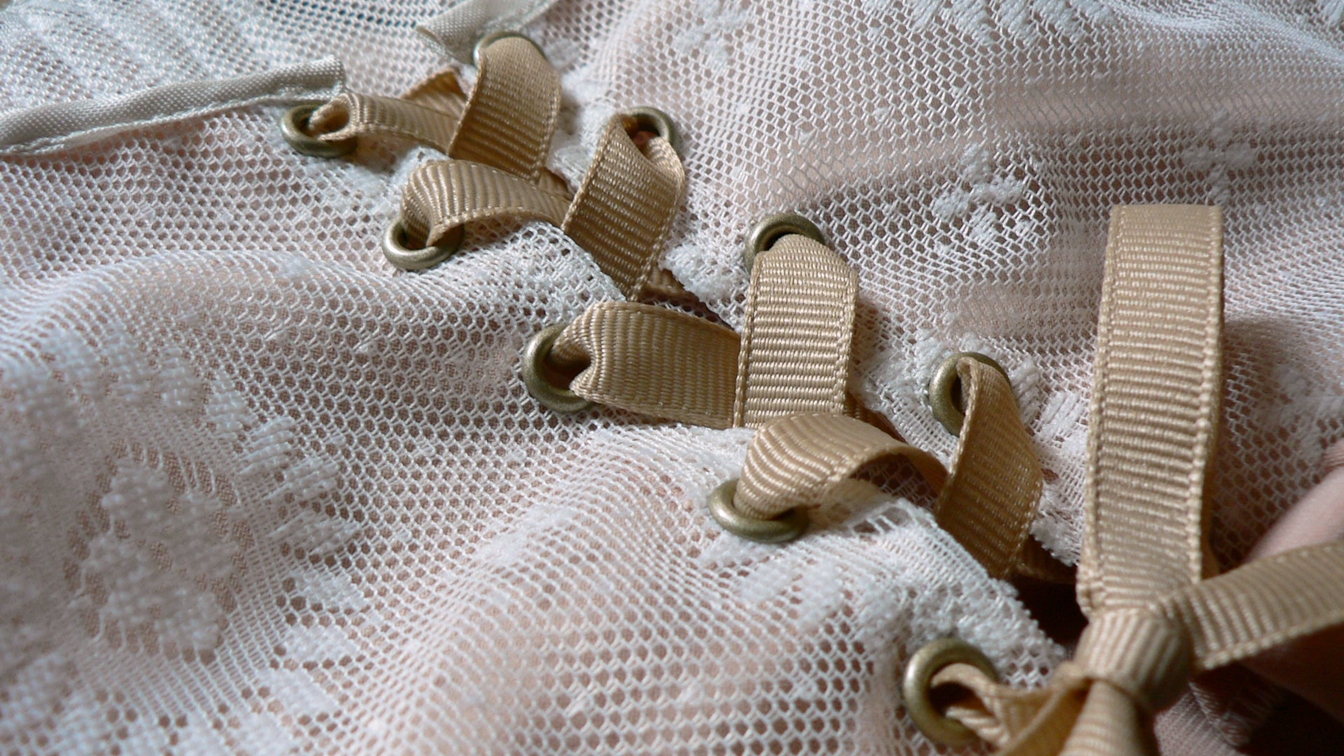
I had a piece of soft, soft Lycra-filled jersey with some grosgrain ribbon that matched it to a moral, and some pretty lace fabric, and a hankering to use the eyelet setter I'd rediscovered when cleaning out a drawer last week. So instead of buying lingerie for a shower I was going to, I decided to throw out the intimidation that has always kept me from making intimates, and came up with this little nightie - and had so much fun doing so!

The top of a simple dress pattern gave some basic dimensions for the bodice, but I altered the front with a split in order to lace it up and made the back bodice one piece by cutting on the fold, taking up what would have otherwise have been the seam allowance with a few cute pintucks (I've been on a pintuck kick recently) at the center back. The Lycra stuff, which is incredibly stretchy - I think it is actually meant as a swimwear fabric, so it stretches in all directions - was a bit of a pain to work with, bunching and rippling instead of feeding through the machine correctly as I sewed it together with the lace, until I caved and started using Scotch tape to stabilize the fabric where I needed to put seams. That worked well, and it ripped neatly apart where the needle punched it, though I ended up with an inordinate number of little sticky strips stuck to my fingers and clothes by the time I was done. But I like that fabric well enough to make it worth it.

I cut out the skirt (a slightly modified rectangle that I eyeballed for size...you know how much of designing is just educated guesswork?) with a rotary cutter to keep the edges super-clean, and it's so fray-resistant that I didn't need to hem or finish the raw edges at all. I didn't even gather the skirt properly (secret: I hate gathering), but pinned it evenly around the bottom edge of the bodice and then fed the wrinkles in at regular intervals as I stitched the two together. Once that was done, I set my serger to a very short stitch length and trimmed and bound that skirt-bodice seam. The serging contains the edges of the lace well enough that they should be quite comfortable and not itchy.

And then all that was left was to bind the top of the bodice (I used a length of vintage acetate binding that I'd pulled from a grab-bag a friend had sent me from her grandmother's de-stashing) and set the eyelets and put in the ribbon for lacing and shoulder straps. Such a gratifying evening project! I don't think I'm going to switch focus off of the gowns anytime in the foreseeable future, but this was a great excursion into previously-unexplored design and sewing territory.

The antique gold eyelets were leftover from a corset order I filled a couple of years ago. I discovered that you can't actually use this kind of eyelet for real corsets; they're too flimsy to bear the stress for that, but they're perfectly suited for this kind of lacing. (I eventually had to go to a leather supply warehouse to get the strong eyelets and anvil set needed for the corset. That kind is not as fun and easy as this kind, which you do with this nifty special set of pliers.)

(P.S. - Making corsets might seem like it would be scarier than making negligees, but it's not. Making corsets is like building with Legos. They're sturdy, and you follow a diagram to put it together, and everything stays put. Working with lace and Lycra and ribbons, on the other hand...that's more like doing fancy French braids on a wiggly toddler with fine hair.)

Tuesday, March 20, 2012

Moving Pictures

I had a lovely surprise when I checked Facebook this morning - White Dress Media just posted a lovely video chock-full of the gorgeous fun we had at the Atlanta NotWedding a couple of weeks ago. (My hands are even in it for a couple of brief seconds, ironing the dress and fastening Tinika's sash on her...*grin*) I hope you enjoy!


The NotWedding // Atlanta, 2012 from White Dress Media on Vimeo.

Thursday, March 15, 2012

The NotWedding Dress Fitting

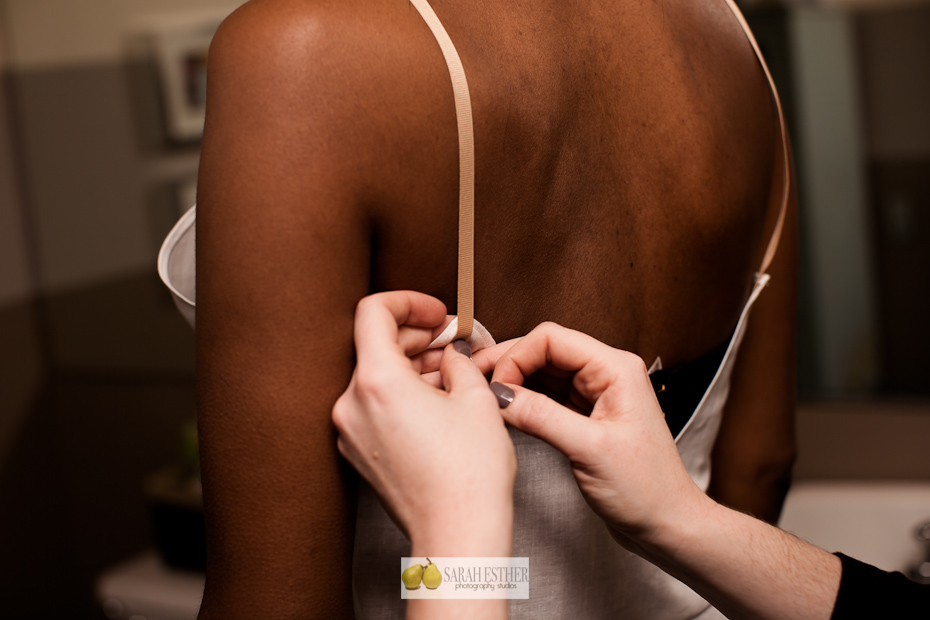
Friends, it's been a whirlwind over the last few weeks - a fun cyclone of traveling, not sleeping much, and sewing, sewing, sewing. I had the fantastic opportunity to attend the "rehearsal dinner" for the Atlanta NotWedding three weeks ago, and took down with me the then-incomplete gown to do some fitting on Tinika, the gorgeous model who would be wearing it for the event.

Besides looking stunning and being incredibly warm, funny, and down-to-earth,
Tinika is a professional model and is used to people having to be all up in her personal space - 

which is always nice when you're in a tiny bathroom trying to fit a dress skeleton on
someone you just met! We had a blast.

Sarah Esther was in there with us, snapping away with her camera, and so unobtrusive
that I nearly forgot she was even present. That's a great thing in a photographer,
by the way. I highly recommend her.

Tinika had taken careful measurements ahead of time, so there wasn't a lot to be corrected; but as a roommate of mine once said, "The female body is a topographical nightmare" - and there are always in-person adjustments that need to be made, especially for a dress with transparent construction like I was planning. This fine muslin underdress was to be the basis for the overdress that I completed back in Chattanooga over the next couple of weeks, and so I needed it to fit perfectly so that I could make everything else fit to it.


This is the unfinished blouse that goes on top of the underdress; and here is where the fitting proved to be vitally important. Tinika has scoliosis - a curve in her spine that isn't obvious from her measurements, but does impact the symmetry of her back. I was able to alter the blouse so that it wouldn't gape or sit askew when she wears it. 


Aaaaaaaaaaaaaaaaaaaaand...I can't let you go without a sneak peek at how the gown turned out. More on this later! Many many thanks to Sarah Esther Photography for the use of these stellar images.


Monday, March 5, 2012

Working on the NotWedding Dress(es), Part Two

Just sticking my head in here for a second to show you all some of the pretty pretty things sitting around my sewing area...and my living room...and...yeah, these projects have taken over the whole house by this point. It's a good thing that I love looking at lace, linen, and silk!


This is a bit of the dress for the Orlando NotWedding - a pewter dupioni sash (with handmade anemones) against a top of ivory lace overlaid on blush satin.

And this is some of the detail on the Atlanta NotWedding flower girl's dress - tiny pintucks on the bodice and a self-fabric applique on each little sleeve.


 I've been doing TONS of French seam work. It makes a lovely finish, but is rather time consuming to do. If you're not familiar with the technique, it basically involves sewing a seam with the raw edges facing OUT (so they show on the outside of the garment), and then trimming the edges very very close to the seam (as shown below), and then turning it inside-out and pressing the seam line and then sewing it again so that all those raw edges are enclosed. Capisce? Don't worry if it doesn't make any sense...it still makes my brain do somersaults every time I do it.


And then there is the fun of dyeing fabrics. This is for the pink sash belonging to the Atlanta dress. Unfortunately, I measured something incorrectly after the test piece, and the whole yardage of what I was going to use turned out rather brighter than I wanted it. I have a backup plan. This will be what I'm doing last minute before I head down to Atlanta on Wednesday.

Clockwise from left: Big pot of dyeing fabric, bottle of Synthrapol, bag of dye activator (soda ash substitute), pot of fiber-reactive dye powder. This is so much fun to do, especially since you have to stir the dyeing fabric for about 45 minutes straight. I watched a lot of music videos. Taking suggestions for the next time I have a dye job.

...so...be on the lookout for the lovely professional photos of the lovely finished projects in just a few days! I'll keep you posted. Have a wonderful week, friends.

Tuesday, February 21, 2012

Working on the NotWedding Dress, Part One

I'm working happily away this morning, banging my brain against problems like the pleats for the blouse of the dress. I'm not sure what exactly is going to happen with this. The geometric difficulties I knew would happen are in fact happening, so I need to figure a way to either avoid or incorporate them... 

It was somewhere around this point that I realized I'd burned the bagel I'd put under the broiler.
Burned it very badly.

The skirt, however, is coming along nicely. I used a pattern I had on hand as a shortcut for some basic dimensions as I plotted out the various layers.


Aaaaaaaaand...if you ever speculated that the dressmaker's life is like a Vermeer painting...


...I'm going to have to disabuse you of the notion. Um. This is more what it's like at the moment around the carefully scrubbed dining-room table where I'm working on this particular project.


And that's the honest truth coming from yours truly today! Have a great Tuesday, everyone. Make messes. Turn them into nice things. Listen to good music while you're doing it. I'll leave you with what I've had on repeat all morning - a little live magic for your ears.


Wednesday, February 15, 2012

Pieces

I'm making two little baptismal gowns for two precious children, one in California and one in Texas; they're the same size, and one is in ivory and the other in white, in soft tissue linen. These are such fun! (You can see what the finished product will look like here.)


Tuesday, February 7, 2012

Headed to The NotWedding, 2012

On my plate for February - making two wedding gowns for actual brides, making plans for a third gown and wedding party-full of outfits for another bride, odds and ends of alterations for local customers, a couple of costumes for my alma mater's production of Aida, aaaaaaaaaaaand...making this.


Yep, I'm headed to The NotWedding (happening March 8 in Atlanta - would love to see you there!), and am so excited to be a part of the fun happenings with other fantastic vendors and once again provide the bridal gown (see last year's here.) The inspiration photo we were sent for the event showed a sleek, dark-haired woman on a deck chair in front of a gigantic, pale coral Asian parasol. She wore a light-colored swimsuit and a modified cloche/bathing cap - the whole scene was fairly minimal and quite early-1900s-influenced. I loved the parasol with its spokes, and the turn-of-the-last-century feel, and decided to incorporate some of that into this design, while keeping a bit of modernity with the low V back and a few details with the buttons and sash that I didn't put in the sketch.

The whole thing will be sewn of my favorite tissue linen (it's such gorgeous, soft, lightweight-but-crisp stuff!) with pintucks and fan-pleats galore. I decided to let you all in on the process this year - so I'll warn you, there may be some publicly expressed angst coming up as I get down to the actual pattern development and construction of the gown. Things might change along the way. I might have to dye the sash five times (oh mercy, I hope not.) I might have to enlist assistance finding the exact buttons I want (so far, the shopping list of attributes in my head includes "square", "fabulous", and "sparkly but muted".) But whatever - it's going to be fun!

...even if I get no sleep during the shortest month of the year in order to get it all done. 

Monday, December 19, 2011

Architect's Gown

Some of my favorite design influences are artists, architects, and furniture-makers of the late 19th/early 20th century. I'm no student of the Prairie School and I couldn't necessarily look at a given structure and tell you who created it; but there is something running through many of the designs from the era that makes my heart hum happily whenever I encounter it.


Now, I promised photos of this gown to you months ago but have run into multiple snags getting it actually ON A MODEL and professionally shot (can't have anything to do with the fact that I initially made it for a model who is 5'10" and a size negative 2!) The gown was displayed at my latest artisan-market-day and I took a couple of minutes during the beautiful sunlit afternoon to snap a pic or two.

click to enlarge


The body fabric is ivory silk dupioni, and the hand-pieced panel down the front is made of a dozen different fabrics from other gowns I've made. Silks, a satin, linens, hemps, bamboo, cotton; all in shades of ivory and white. Each tiny section is outlined with a heavy machine topstitch in ivory to mimic the leading in a stained glass window. This is perhaps the most fun I've yet had in creating a gown and I'm in love with it! One of the things that delights me about this gown design is that the "window" will necessarily vary from dress to dress, as it will be created to specifically complement the shape and scale of the custom-fit gown.

click to enlarge
Now, in related news, I am hard at work designing a completely new gown for the next NotWedding in Atlanta this March! The theme has a bit of a 1920s vibe to it, and my mind is swirling with ideas. I will, however, be taking an entire week off after Christmas to read, write, clean, and organize, and in general clear the slate to begin 2012 with an unobstructed view to the horizon.

Have a lovely last couple of weeks of the year, friends. Practice joy as you celebrate the holidays with people you love (and people you have to work on loving!) As you find yourself overflowing, may your abundance nourish others. As you find yourself empty, may you find that which was meant to fill you. To all of you - Merry Christmas!


Tuesday, November 15, 2011

Kids, Puppies, Dirt, and Glossy Catalogs

I often wonder if I'm doing the right thing by bringing more "stuff" into the world. While I see a lot of my sewing work as redemptive - helping people feel beautiful and valued and cared-for, helping rightfully honor and celebrate events like weddings and baptisms that have cosmic-level meaning - I have this current of guilt that sometimes runs through all the self-promotion I do for my work. Encouraging people to buy. Urging people to acquire something. And yes, my clientele are those that are looking to buy already - but that's beside the point.

I read a great blog this morning about the contrast between the joy of an impoverished child and her dog, and the sometimes disturbing marketing techniques of some of the magazines that many of us adore. It reinforced to me that the difference between consumerism and simply valuing quality in moderation has an awful lot to do with what's in our hearts. It reminded me and encouraged me in what I really want to do, whether it's with my hands and scissors and fabric, or with my smile, or with my prayers. I want to live as a conduit of the grace and joy that has been given to me. I want the choices I make to be derived directly from this way of living. If my craft were taken away from me this afternoon - if I lost my arms, or eyes, or words - I want to know that the primary ways that I help create beauty in this world would still be open to me.

And now - back to the sewing machine. I have a quilt for a precious little man that I need to finish up.


Thursday, October 6, 2011

Texture

I'll be showing a few of my Laurel & Fife gowns as well as several Triggi Designs pieces this Friday and Saturday at the Clothesline Art Show at the St. Elmo Fire Hall. The work I'll be displaying will showcase the use of remnants and scraps as embellishment - one of my favorite things to do, as I use so many lovely fabrics and hate to let the last bits go until I've used them up beautifully!

Petals in various shades of coffee-dyed hemp/cotton weave, on a background of tissue linen...
all leftovers from bridal and baptismal gowns I've made this summer.


Come out Friday night for the artists' reception (with refreshments...hmmm....what shall I make?) or Saturday to view the beautiful work of several local artists and browse for possible holiday gifts or items for your home. Despite the "Clothesline" name, this is mainly an art show, and most of the work represented isn't clothing or crafts. I'd love to see you there!

-Bekah

Wednesday, September 28, 2011

Wedding Dress Alchemy

It appears to be a growing trend for brides to alter/shorten/dye/otherwise change their bridal gown after their wedding day so that they can wear it again for other functions. I've done this before - for a wedding gown I'd created, actually, which got shortened to knee-length and fiber-dyed sage green.


But today's post concerns a wedding gown I didn't make. Hear the tale of the Taming of the Poly Duchess Satin Dress.


The young husband contacted me; he and his wife were moving to Europe, and were paring down their belongings to the bare minimum. She did not have any deep attachment to her wedding gown, and it had had some water damage while being stored since they got married a few years ago. They asked me to see what I could do with it to turn it into a party dress and pretty much gave me free reign on the design aspect.

I told them from the beginning that I wasn't sure if I could do much with it. I've worked a little with dyes before, but always on natural fabrics - which are ever so much easier to dye than synthetics. I knew that this thick polyester satin was going to be unpredictable and perhaps un-dyeable, but since their other option was to give the gown to Goodwill, I went ahead.

First, I cut off several feet of train and a good twenty-four inches off the front hem of the dress, and removed a bajillion layers of tulle from underneath. I left one small layer in for a bit of a swing.


I hemmed it, using a poly/cotton blend thread, and after doing a bit of research, bought my dyes.


Polyester fibers are not like natural fibers at a molecular level, and you can't dye them the same way. I won't go into the whole explanation here, but if you're a geek or a fabric fiend, it IS kind of fascinating (try this article). The more I researched it, the more intimidated I became (because of articles like this one) and also the more determined I was to make it work. As I gathered information, two main pieces of advice kept surfacing - #1. Don't dye polyester. It won't work. #2. If you must dye polyester, use iDye Poly.

So I picked up some iDye Poly in red and violet from my local craft supply place. I wanted to dye the dress a deep wine color, along with a little extra fabric from the train to make into a belt. The plan was to remove the bow from the bodice, move some of the buttons from the back of the dress (they went all the way down the train) and put them where the bow was, and maybe add straps for a nice, simple, little retro swing dress.

It occurred to me that I'd better remove the beaded trim around the collar, because it probably wouldn't take the dye either...which meant ripping it out and then turning the dress inside out to sew the collar back onto the bodice. Not complicated, but tedious and a little nitpicky. (This is the kind of work where you call up a friend and make her come over and have tea and talk to you while you go to town with your seam ripper.)


I washed the dress (gleefully ignoring the "dry clean only" label), which took the rusty water stains right out and ostensibly removed oils and other residue to make the dye job even. Then it was time to dye! I have a cheap soup pot, twice the size it needs to be for any big batch of chili, that has now become my dyeing vat. It was *barely* big enough to hold the dress and the small bit of extra fabric that I threw in with it. I remembered about the extra buttons just in time and tossed some in, worrying a little that they'd stay at the bottom of the pot and melt as I simmered and stirred the dress on my stovetop for an hour.

See how the tulle is dyeing too? I wasn't sure whether to expect that or not. Nice surprise.

It all appeared to be turning a nice reddish plum. When the hour was up, I took it down to our basement where we have a big utility sink and began the rinsing process. It takes FOR. EV. ER. to rinse this stuff out. And I almost lost all the loose buttons down the drain in the process. And I did splash some of the dye ten feet across the room onto one of my roommate's nice white unmentionables, which I ended up dying completely so now she's got nice deep wine-colored unmentionables instead of weird purple-Dalmation-spot ones.

However, as I rinsed the dress, it became patently obvious that not only was the fabric not deep wine colored but actually an alarmingly bright fuchsia, but it was also blotchy. In weird places. There were two spots on the back - at the waist and just under the shoulder blade - that I realized must have been where the groom put his hand as they took pictures together and posed and danced. My pre-wash hadn't been able to get those oils off, and they affected the way the polyester took the dye. There were also random other blotches here and there, noticeable, and not evenly-spread enough to look like impressionistic watercolors. 

Fuchsia. One of the more commonly misspelled colors in the English language.
After careful consideration, I tossed out the ideas of a) creating a lace overlay for the entire dress, b) covering it all with bunchy tulle ruffles, c) re-dyeing it (I had no reason to expect that the dye wouldn't darken/deepen the blotches, too) and d) just telling the couple that the dye ate the dress and burying the poor thing in my trashcan. I hung the dress to dry (it looked worse when it dried completely) and left it for several days while I dealt with other work.

While gathering some materials for another project, I saw small cans of fabric spray-paint and thought, "Well, I've got nothing to lose at this point." I brought home two of them - a bright violet and a deeper purple - and tested them on the extra piece of fabric I'd dyed. Remembering an art technique from my middle school watercolor class, I wet half of the piece of fabric and sprinkled rock salt liberally over it, and then sprayed the paint lightly over the whole thing to see the difference in how the paint worked with the different preparations. Even thought the can says it gives "even application," it most certainly doesn't, but in this case, I was going for MORE blotchiness than I had, so that was all right. After shaking off the salt, letting the fabric dry, and inspecting the result, I decided to go for the wet fabric, with salt, using the violet paint only. I did about three rounds of that on the whole dress, and when I was done, it looked...different. Not quite the watercolor effect I was going for, and still overwhelmingly fuchsia. My roommates took to calling it the Late 80's Barbie Dress, with the electric pink Jackson Pollock thing going on.

So after a few more days of trying not to think about it, I finally went to my fabric scrap bin for inspiration. I had some silky gray ribbon lying next to some gold silk...and the thought struck me. Back to the craft supply store I went, and got a couple of spools of satin cord in shades of gray, and lengths of the same old-gold ribbon in both satin and grosgrain weave.

After lots of cutting and pinning and zigzag topstitching, I had a nice little asymmetrically-cascading garden all over half of the dress. I took the corners of the collar center and folded them open and tacked them in place. I didn't have time to put it on my mannequin or take another photo after I pressed it, because the customer was on his way over to collect it, but you can get the general idea of the finished product! Since it still fits the owner so well, and she looks good in this palette, I'm tickled...fuchsia...with how it turned out.


...But I don't know if I'll ever try to dye polyester again!

p.s. the couple "loved it." No matter how confident I am in my work, that is always a huge relief to hear =).

  © Free Blogger Templates 'Photoblog II' by Ourblogtemplates.com 2008

Back to TOP